
Flight#
On the tablet version, you’ll find the Flight Parameters menu on the Tablet Menu Bar. On the mobile version, it’s located under Configuration > Flight parameters inside the Tools section.
Briefing#
After planning your route, the Briefing feature allows you to generate the following flight documents: Weather, NOTAM, Navigation Log, Weight and Balance sheet and ATC Flight Plan. You can also create a Post Navigation Log after the flight. Read more on the Briefing page.
Flight Time#
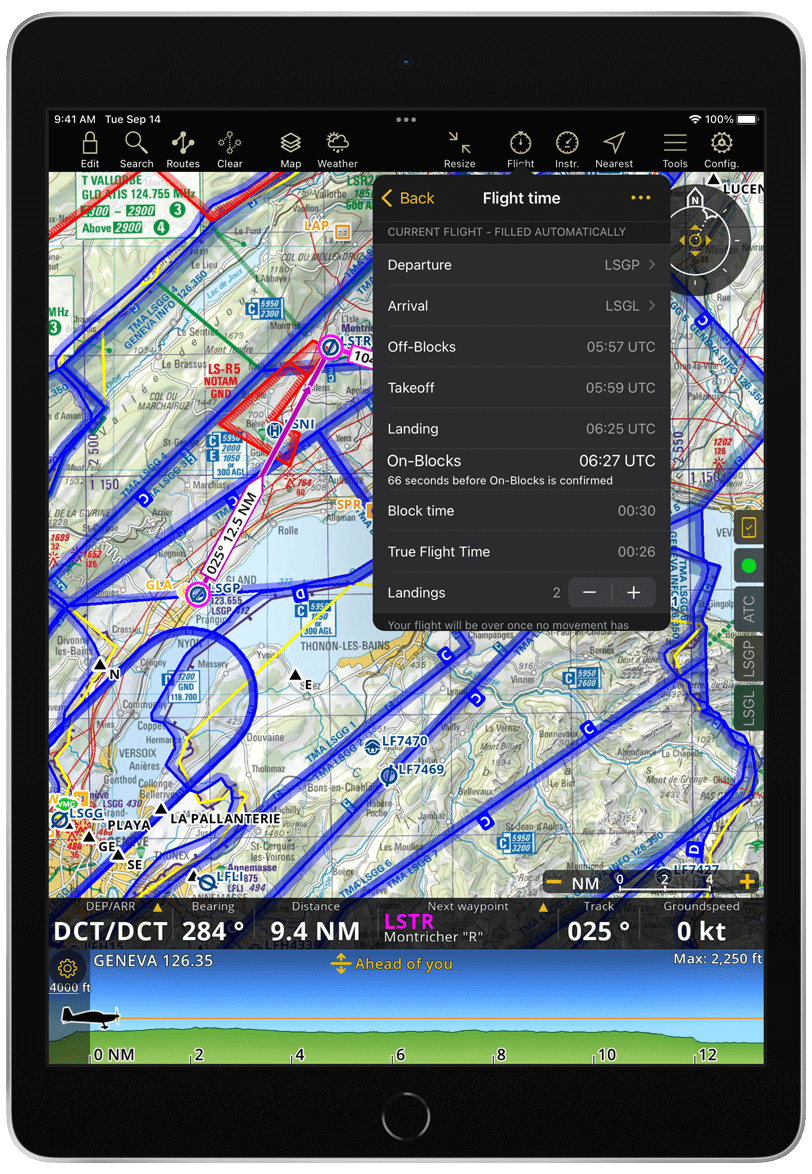
Here you will find the flight time information for your current flight, filled out automatically for you, but you can override the values if needed in the Logbook.
Departure and Arrival: The app will set as departure and arrival for your flight the nearest aerodrome within the range of 2.5 NM from your current position. The following airport types are taken into account: aerodrome, heliport, seaplane base, ultralight field, glider field and balloon field.
Off-Blocks, Takeoff, Landing and On-Blocks: You can choose between the following two detection methods.
Based on speed
The app uses groundspeed indication to automatically set your flight times:
Off-Blocks: Set when your speed increases above 2 m/s.
Takeoff: Set once your speed exceeds 30 knots.
Landing: Set when your speed decreases below 25 knots and either altitude decreases below 100 m or an airport is within 2.5 NM of your current position.
On-Blocks: Set after landing when your speed decreases below 1 m/s.
We recommend this option for airplanes.
Triggered with buttons
This option displays buttons on top of the Moving Map which you’ll tap to indicate the moment of takeoff and landing. Off-Blocks and On-Blocks times will be the same as Takeoff and Landing times, respectively. Alternatively, you can enable to also set On/Off-Blocks times via buttons.


The buttons will appear progressively, not all at once. After tapping the Off-Blocks button, the Takeoff button will appear, and so on. After takeoff, in addition to the Landing button, a Touch and Go button will also appear, allowing you to increase the number of landings by tapping on it.
We recommend this option for helicopters. It can also be useful during flight training sessions involving Touch and Go maneuvers to ensure the app counts the landings correctly and doesn’t prematurely end your flight.
Block Time: The app automatically calculates the time difference between Off-Blocks and On-Blocks.
True Flight Time: The app automatically calculates the time difference between Takeoff and Landing.
Note
For the Block Time and Flight Time calculations, the default time format is hh:mm, but you can change it to display time as decimal numbers via Configuration > Settings > Logbook Time.
Landings: The app will display the number of landings detected. You can manually adjust the value using the + and - symbols if needed. You can also display the number of landings for your current flight on the Navigation Bar.
You can add additional information to your current flight:
Aircraft Identifier: If you’ve already created an Aircraft Profile, the app will automatically retrieve the aircraft registration from the currently selected aircraft. Alternatively, you can input the aircraft identifier manually.
Crew: Write the names of your crew members.
Remarks: Add a comment as note.
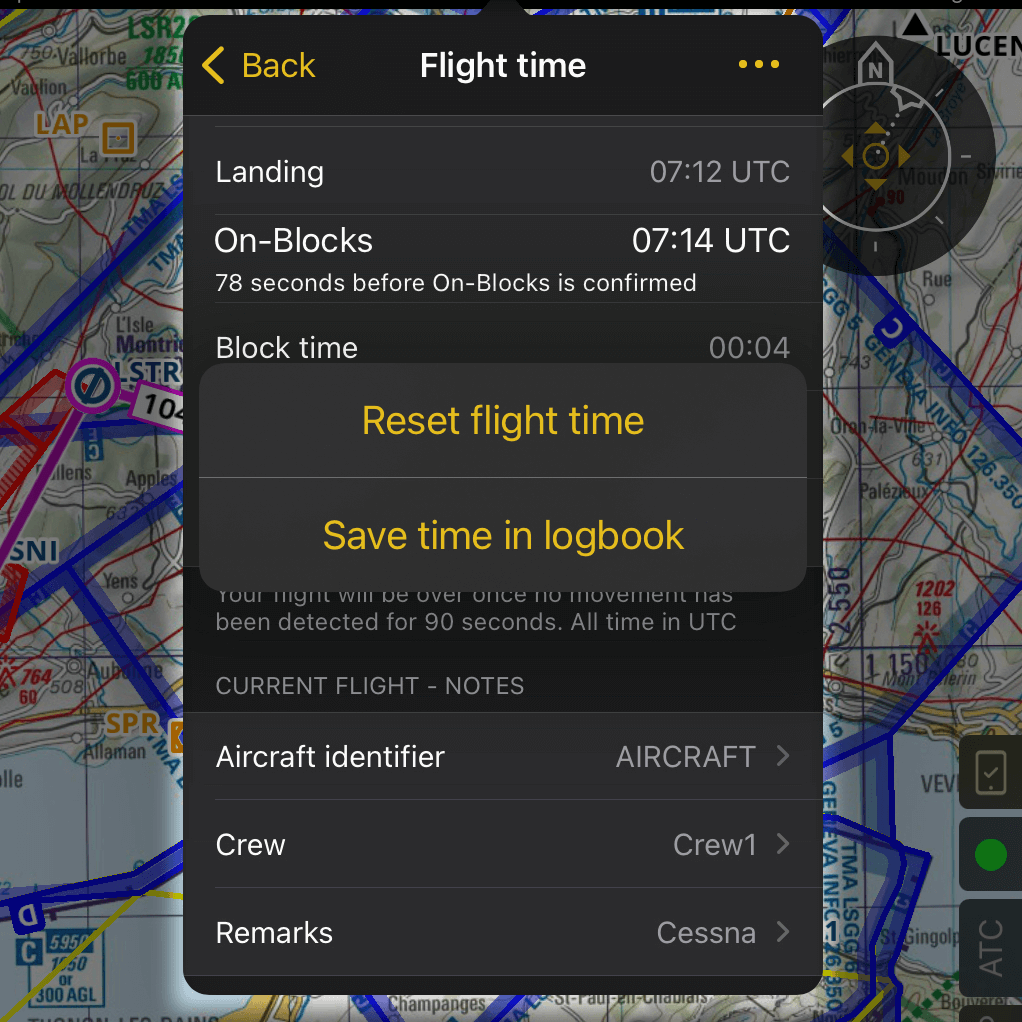
Save/Reset the Flight Time values#
Your flight time information is automatically saved on your Logbook after On-Blocks time is detected. When the times are set based on speed you will be given 90 seconds to make changes before the flight is terminated and all values are stored and reset. When the times are triggered with buttons the flight is terminated immediately.
You can also save the flight manually:
Tap the … icon on the top right corner
Tap Save time in Logbook
Or reset all values:
Tap the … icon on the top right corner
Tap Reset Flight Time
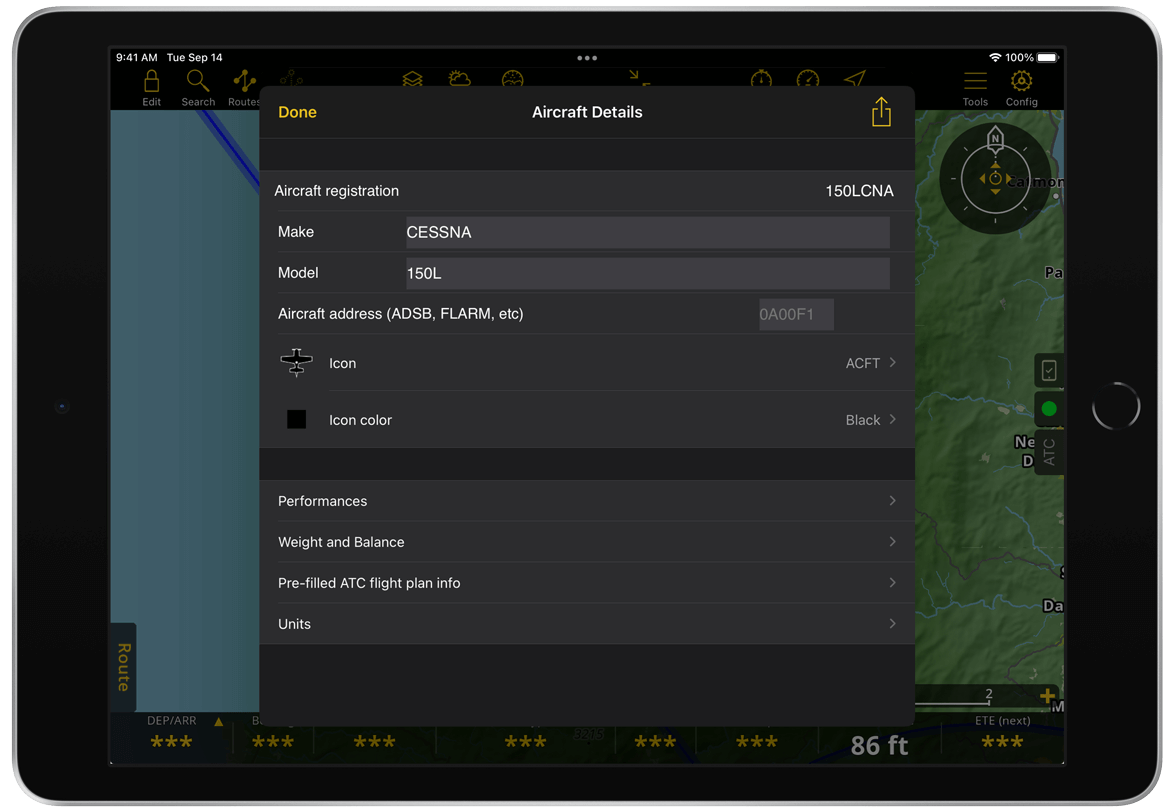
Aircraft Profile#
The first step in flight preparation is to create an aircraft profile for the aircraft you operate. This profile is essential, as it allows the application to pre-fill the ATC Flight Plan in your flight briefing and calculate the Weight and Balance based on the aircraft configuration.
When you first open the application, a default aircraft named Aircraft is preselected as the Current aircraft in the Flight parameters menu. You can view and modify its details by tapping the ![]() icon.
icon.
If you operate multiple aircraft, you can create a separate profile for each one.
Create an Aircraft Profile#
You can create an aircraft profile using one of the following methods:
Search by Registration ID or Aircraft model
Manual entry
Upload an Aircraft Flight Manual (AFM)
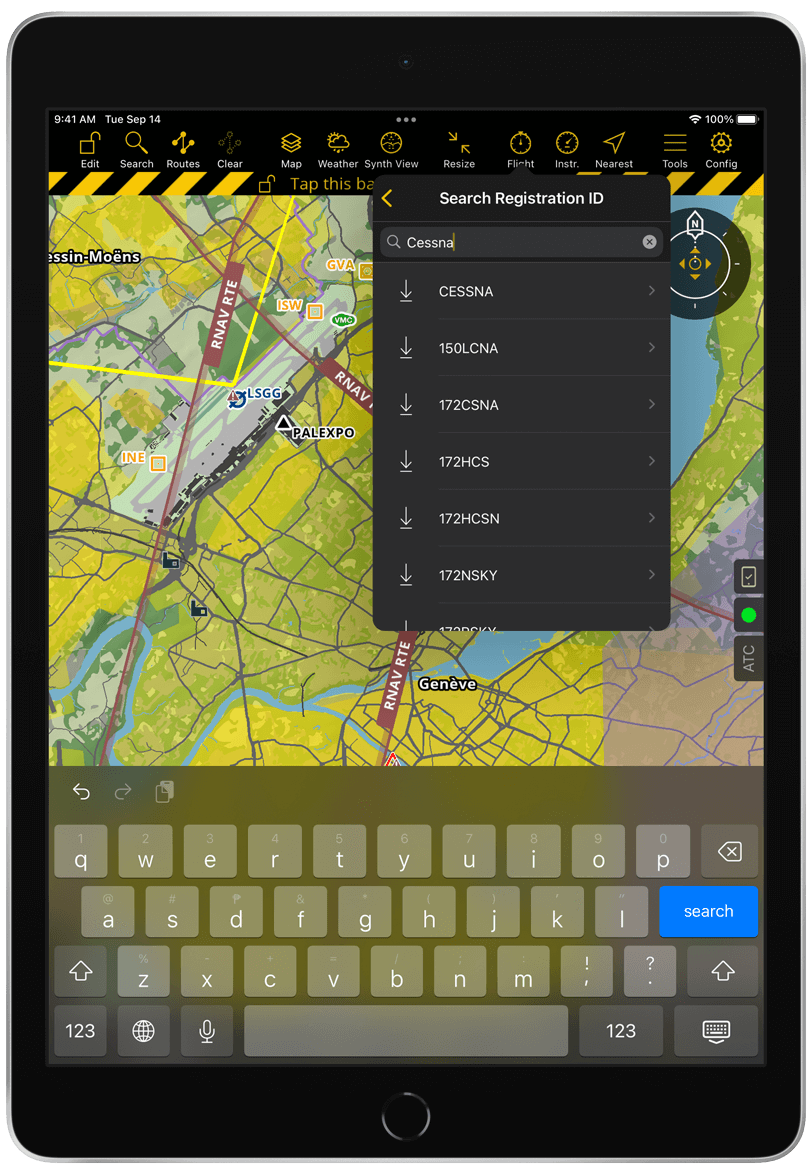
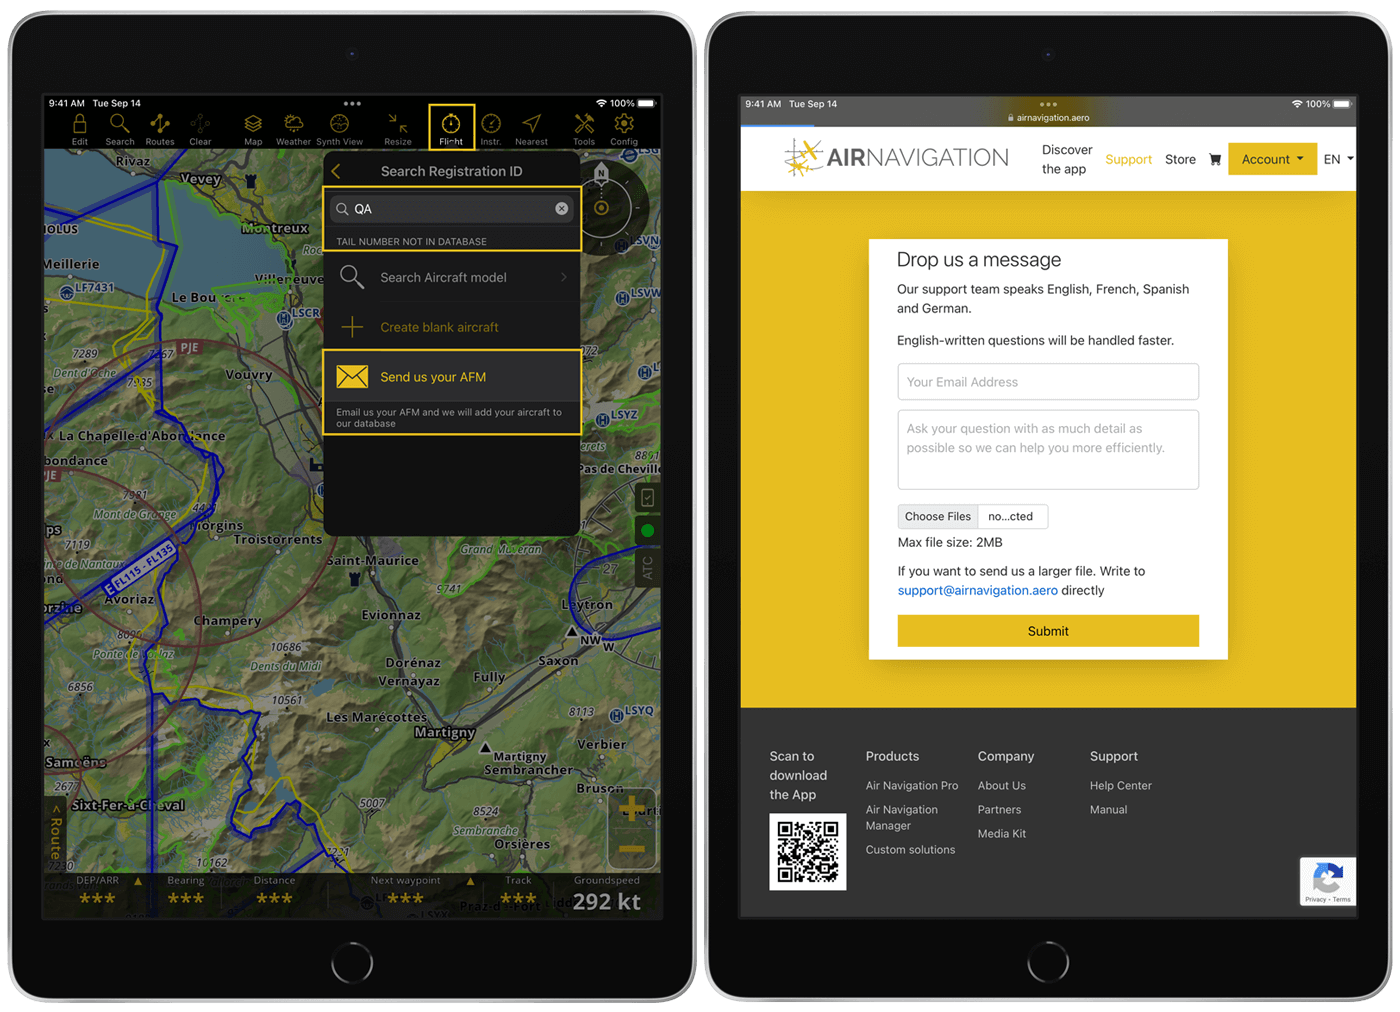
Search by Registration ID or Aircraft Model#
Aircraft selection follows a guided 2-stage process: search by Registration ID, then by Aircraft model if no match is found.
Go to Flight (tablet) or Config > Flight parameters (phone).
Tap Current aircraft.
Tap + New aircraft.
Step 1 – Search by Registration ID
Enter the aircraft registration ID.
If a match is found, select it to complete the process.
If no match is found, a message is displayed:
“Tail number not in database”
You can then choose an option:
Tap Search aircraft model to continue with model search
Tap Create blank aircraft to create a manual profile
You are also encouraged to submit your aircraft data:
Tap the provided link to send your Aircraft Flight Manual (AFM) via the support system
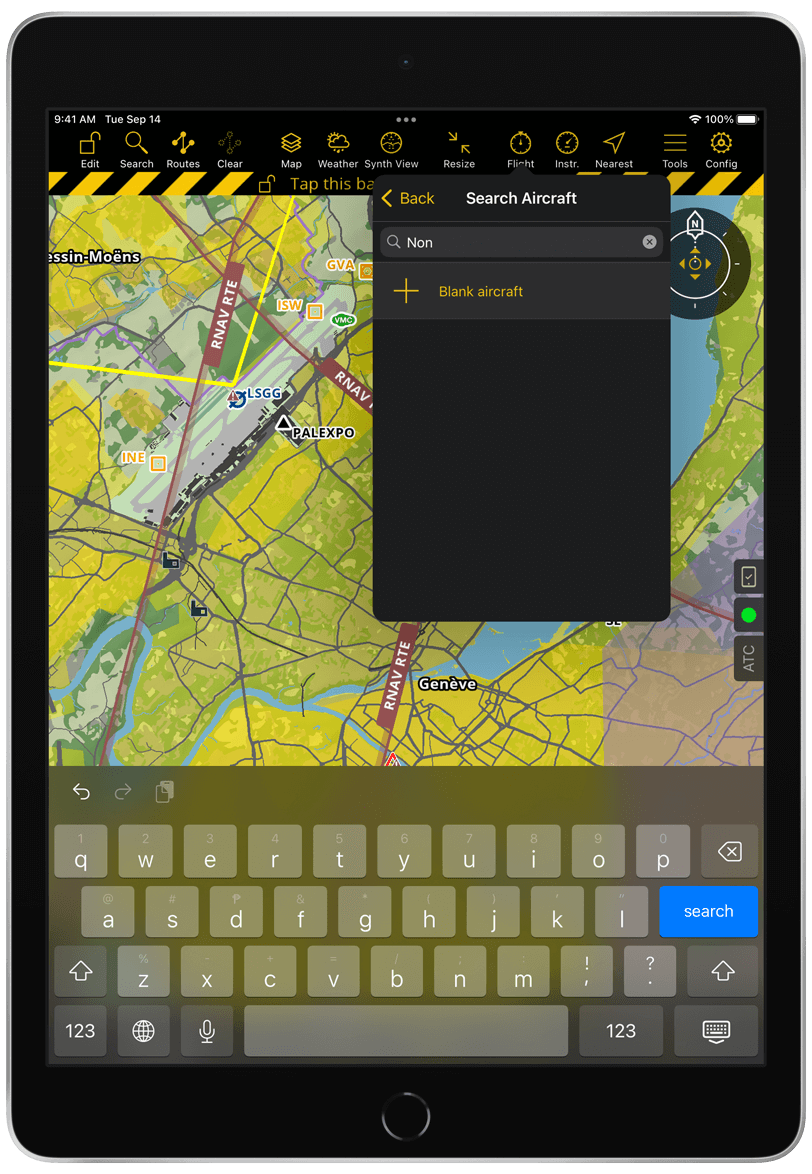
Step 2 – Search by Aircraft Model
Enter the aircraft model.
If a match is found, select it to continue.
You must enter a unique Aircraft registration and an option to update Empty weight and Arm values.
If no match is found, a message is displayed:
“Model not in database”
You can then choose an option:
Tap Create blank aircraft
You may also submit your AFM using the provided support link.
Note
The Create blank aircraft option may also appear automatically in the following cases:
When you are logged out
When the device is offline
When the search service is unavailable
Important
When selecting by registration ID, the Registration field is auto-filled and cannot be edited.
When selecting by model, you must enter a unique Registration, which cannot be edited after saving.

Manual Entry (Blank Aircraft)#
Use this method to manually create an aircraft profile.
Go to Flight (tablet) or Config > Flight parameters (phone).
Tap Current aircraft.
Tap + New aircraft.
Tap Create blank aircraft.
Enter the required aircraft details.
Tap Done (tablet) or Back (phone).
Upload Aircraft Flight Manual#
If your aircraft is not available in the database, you can submit its Aircraft Flight Manual (AFM) to have it added.
Tap Send us your AFM from the search flow, or access the support page directly.
Upload the file or send it by email to support@airnavigation.aero with the subject AFM submission (for files larger than 2 MB).
Note
Submitted AFMs are reviewed and processed by our team. Processing time may vary.
Manage Aircraft Profiles#
The currently selected aircraft is displayed at the top of the list with a yellow checkmark.
You can manage aircraft profiles as follows:
View all profiles: Tap Current aircraft
Modify details: Tap the
 icon
iconSwitch aircraft: Tap an aircraft in the list to set it as the Current aircraft
Delete a profile: Swipe the aircraft entry from right to left
Share a profile: Tap the
 icon (see Import/Export: Aircraft profile)
Alerts#
You can configure specific alerts to enhance situational awareness. Use the toggle to activate them.
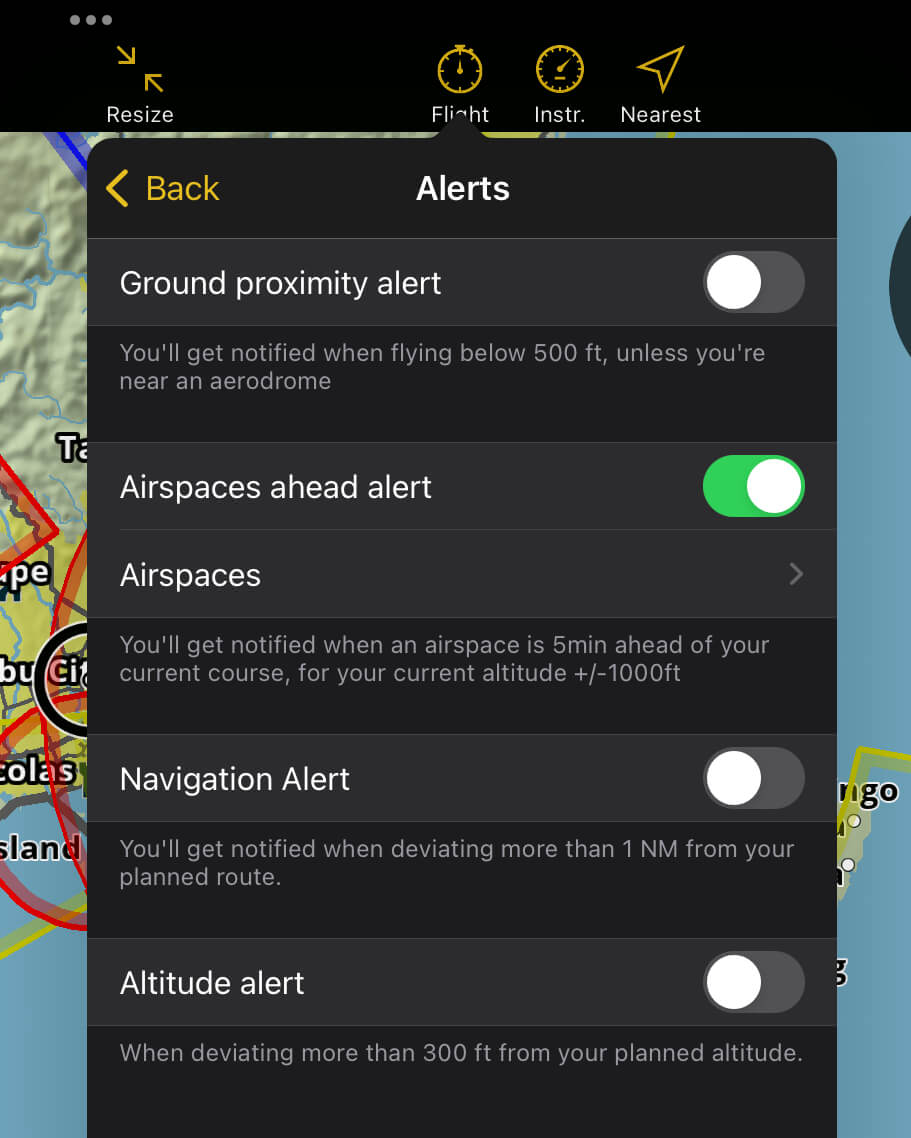
Ground Proximity Alert: Notifies you when flying below 500 ft, unless you are near an aerodrome.
Airspaces Ahead Alert: Notifies you when an airspace is 5 minutes ahead of your current course at your current altitude ±1000 ft. When toggled ON, you will always get notified for airspaces classified as A, B, C, D, Danger, Prohibited, Restricted, CTRs, TMZ and MATZ (MIL). By tapping on Airspaces, you can select additional airspace classes you want to be notified about by tapping on them in the list. A yellow checkmark will indicate when they are selected. Alternatively, you can choose the All airspaces on the map option which will alert you of all airspaces you have configured to be displayed on the Moving Map under Map options > Airspaces.
Navigation Alert: Notifies you when deviating more than 1 NM from your planned route.
Altitude Alert: Notifies you when deviating more than 300 ft from your planned altitude.
Traffic alerts can be activated under Map options > Traffic information.